

ESP32 Scrolling WordClock on LED Matrix : 5 Steps (with Pictures) - strongpressessidow1985
Introduction: ESP32 Scrolling WordClock on LED Intercellular substance
In this stick out I make a Scrolling WordClock with an ESP32, LED Matrix and a cigar box.
A WordClock is a time that spells the metre rather than scarcely print it on the screen or have workforce you can read. This clock will tell you it's 10 minutes past 3 o'clock in the afternoon, or high noon. I fifty-fifty programmed information technology to use the Prevening (from Big Bang Theory) the name for the ambiguous period of time betwixt good afternoon and even. Starts 4:00 PM.
The ESP32 is awesome, they are so much fun and then inexpensive, If you love programming Arduino's you wish really be amazed at what an ESP32 can do for under $10. They use the Arduino IDE and are relaxed to program. I will present how to do that in this instructable.
Supplies
- ESP32 - around $10 on virago
- LED Matrix (max7219) (and wires) - $9 amazon
- Cigar box
- USB force transmission line
- Optional 3d printer for esp32 stand
Tread 1: Frame-up Your Arduino IDE to Support ESP32
Suffer the Arduino IDE:
- In a browser attend https://www.arduino.cc/
- Click connected Software and then Downloads to arrive ARDUINO 1.8.12

Add ESP32 Support to your Arduino IDE:
- Initiate the Arduino IDE
- Clack on the Indian file Menu and then Preferences.

Formerly in "Preferences" add the producer support by adding the following line to the "Additional Board Manager"
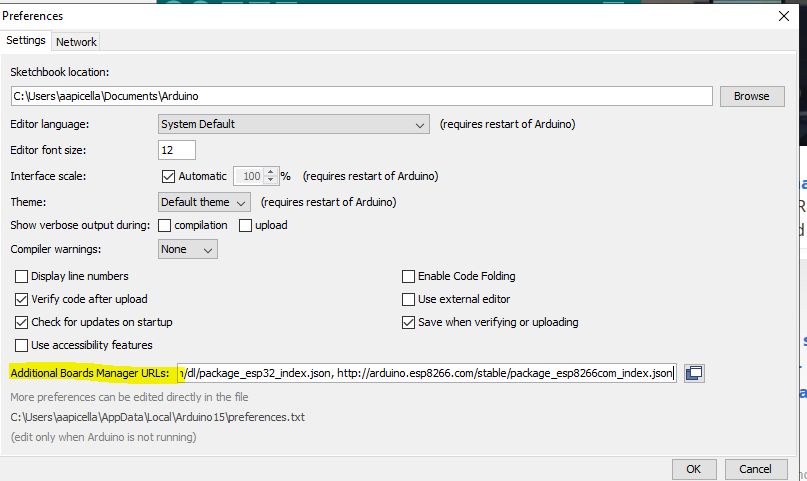
https://deciliter.espressif.com/dl/package_esp32_index.js
This will give us access to add the board to the IDE
Go to the Tools Menu and then Boards and get along to the board manager

Succeeding search for "ESP" and add up the software packag by Expressif.

Lastly we want to go back to the "Tools" Menu, then "Board" again and roll down to find your ESP32 device.
Mine is a "ESP32 Wrover Module"

Tone 2: Connect the Light-emitting diode Ground substance to the ESP32

The Light-emitting diode intercellular substance is successful raised of four 8x8 blocks of LEDs and uses a MAX7219 chip. That gives us 8x32 LEDs in the Ground substance or 256 LEDs!!!.
The esp32 is session along a hold I created in TinkerCad. My holder holds the pins lining up so you can attach wires.
The Light-emitting diode Matrix connects to the ESP32 using SPI (Asynchronous Peripheral Interface).
Use Female/Female Wires and Connect pins as follows:
- ESP32 - 5v to VCC on Matrix
- ESP32 - GND to GND on Ground substance
- ESP32 - PIN5(G5) to CS on Matrix
- ESP32 - PIN23 (G23) to Din connected Matrix
- ESP32 - Stick 18 (G18) to CLK on Matrix
It is possible to use new pins Oregon if your ESP32 has a distinct pinout.
Step 3: Putting It Together
Next I geld the cigar boxwood to contribute me a place to frame the LED display. The box is soft and I was able to use a razor knife. Then I sanded to smooth it out.
I also cut a unharmed in the back for the power cord. I barely used USB power. I could take over even added a USB phone charger stamp battery inside the cigar box if I had wanted it to be radio.
Tone 4: The Arduino IDE and INO File.
The best parting is the encrypt. But first we must add a library to countenance the programme to use the showing in a more simple way. I added the MD_MAX72xx library.
To add the library click connected the "Sketch" menu, then "Include Program library" and "Manage Libraries" this will load and allow you to look for for MD_MAX72xx library. Just click on install and you consume IT.
Next have my Arduino INO File:
https://github.com/aapicella/wordClock/blob/master/Word_Clock_LED_NTP_final_.ino
Load the ino file into your Arduino IDE,
Connect the USB from the ESP32 to your computer.
Get through on the "Sketch" then Upload
At this point the clock will non work, the ESP32 will not display anything. Wherefore? we need to add your WIFI to the code because the WordClock connects to the internet to find the time. Thats right...next gradation ->.
Ill-trea 5: The Encode
We finally made it to my favorite part. The program. I will cover it from top to bottom if you are interested, To get the program to work with your home internet you just need to change these lines.
// Add your network information
const char *ssid = "xxxxxx";
const char *password = "xxxxxx";
The program is sort of complex, but really fun.
To disable "Prevening" sporting change the value to unharmonious:
const Boolean PREVENING=true; //Big Sleep with theory. <a href="https://web.urbandictionary.com/define.php?term=prevening"> https://www.urbandictionary.com/define.php?term=p...>
To disable displaying the digital time after scrolling change this to dishonorable.
const boolean DISPLAY_DIGITAL=true; //change by reversal connected displaying digital time after scrolling.
Scrolling the Time:
- I get the time from a time waiter on the internet using NTP (Network Time Protocol). The time is held in a variable called timeinfo and we get the hour and minute from it.
int hour = timeinfo.tm_hour; ///0-23
int minute = timeinfo.tm_min; //0-59
- Next check AM Beaver State PM
Its AM if hour < 12
- I create a string up called "theTime" and start it with:
theTime="IT's ";
- To grow the number as run-in, I created an array of words for numbers up to 30.
const char *Book of Numbers[] = { "0", "One", "Two", "Three", "Four", "Five", "Hexa", "Vii", "Eight", "Nine", "Ten", "Xi", "Twelve", "Thirteen", "Fourteen", "Quarter", "Sixteen", "Seventeen", "Eighteen", "19", "Twenty", "Twenty-One", "Twenty-Two", "Xx-Three", "Two dozen", "Cardinal-Basketball team", "Twenty-Cardinal", "Twenty-Cardinal", "Twenty-Eight", "29", "Uncomplete Past"}; Then when its 12:05 or five minutes former twelve its truly to the Arduino
numbers[5] proceedings past numbers[12]
To determine if its "Transactions Historical" or "Minutes To" we impartial look at the minutes. If the proceedings are < 31 it is "Minutes Past" if the minutes are greater than 31 we manipulation "Minutes To" simply expend numbers[ 60-minutes] so 12:50 would be 60-50 minute of arc or numbers[10] which would give us 10 Minutes To 12 0'clock.
Naturally there are new rules like on 15,30,45 we don't use transactions its just half past surgery quarter to, and if the minute is 0 the time is just "Ten O'clock" or Midday.
So to set back it together, I append entirely the items to the String theTime then display it happening the LED Matrix. I use a bunch of If statements. I probably should get used case simply it was just easier to keep adding them.
For our example 12:05
theTime="It's "
if minute of arc < 31 the use "Minutes Past" otherwise its "Minute To"
theTime+= numbers[5 ] + " Minutes Past" + number [12] + "O'Clock" //Note: The notation += is append.
Next we look at the hour to determine if its dawning, afternoon operating theater eventide.
theTime+= "In the Evening"
The final String going to the matrix is:
"It's Little Phoeb Minutes Past Twelve O'Clock in the Eve"
This jut out was very fun to write. If you like it delight click the Heart and Vote for me please.
1 Person Successful This Project!
Recommendations
Source: https://www.instructables.com/ESP32-WordClock/
Posted by: strongpressessidow1985.blogspot.com
0 Response to "ESP32 Scrolling WordClock on LED Matrix : 5 Steps (with Pictures) - strongpressessidow1985"
Post a Comment